小问题很多,丝毫不逊色 Bug11,特地整篇 blog 记录下
默认输入法 CapsLock 切换卡顿
常用快捷键
Clang VSCode 下的 C/C++ 环境配置
默认输入法 CapsLock 切换卡顿
Reference: 有关
Macbook“中/英(Caps lock)”键”间歇失灵“的问题
写代码的时候,聊完微信/search 完,快速 CapsLock
切换导致卡顿,有时候还切不过去,这不能忍,一通
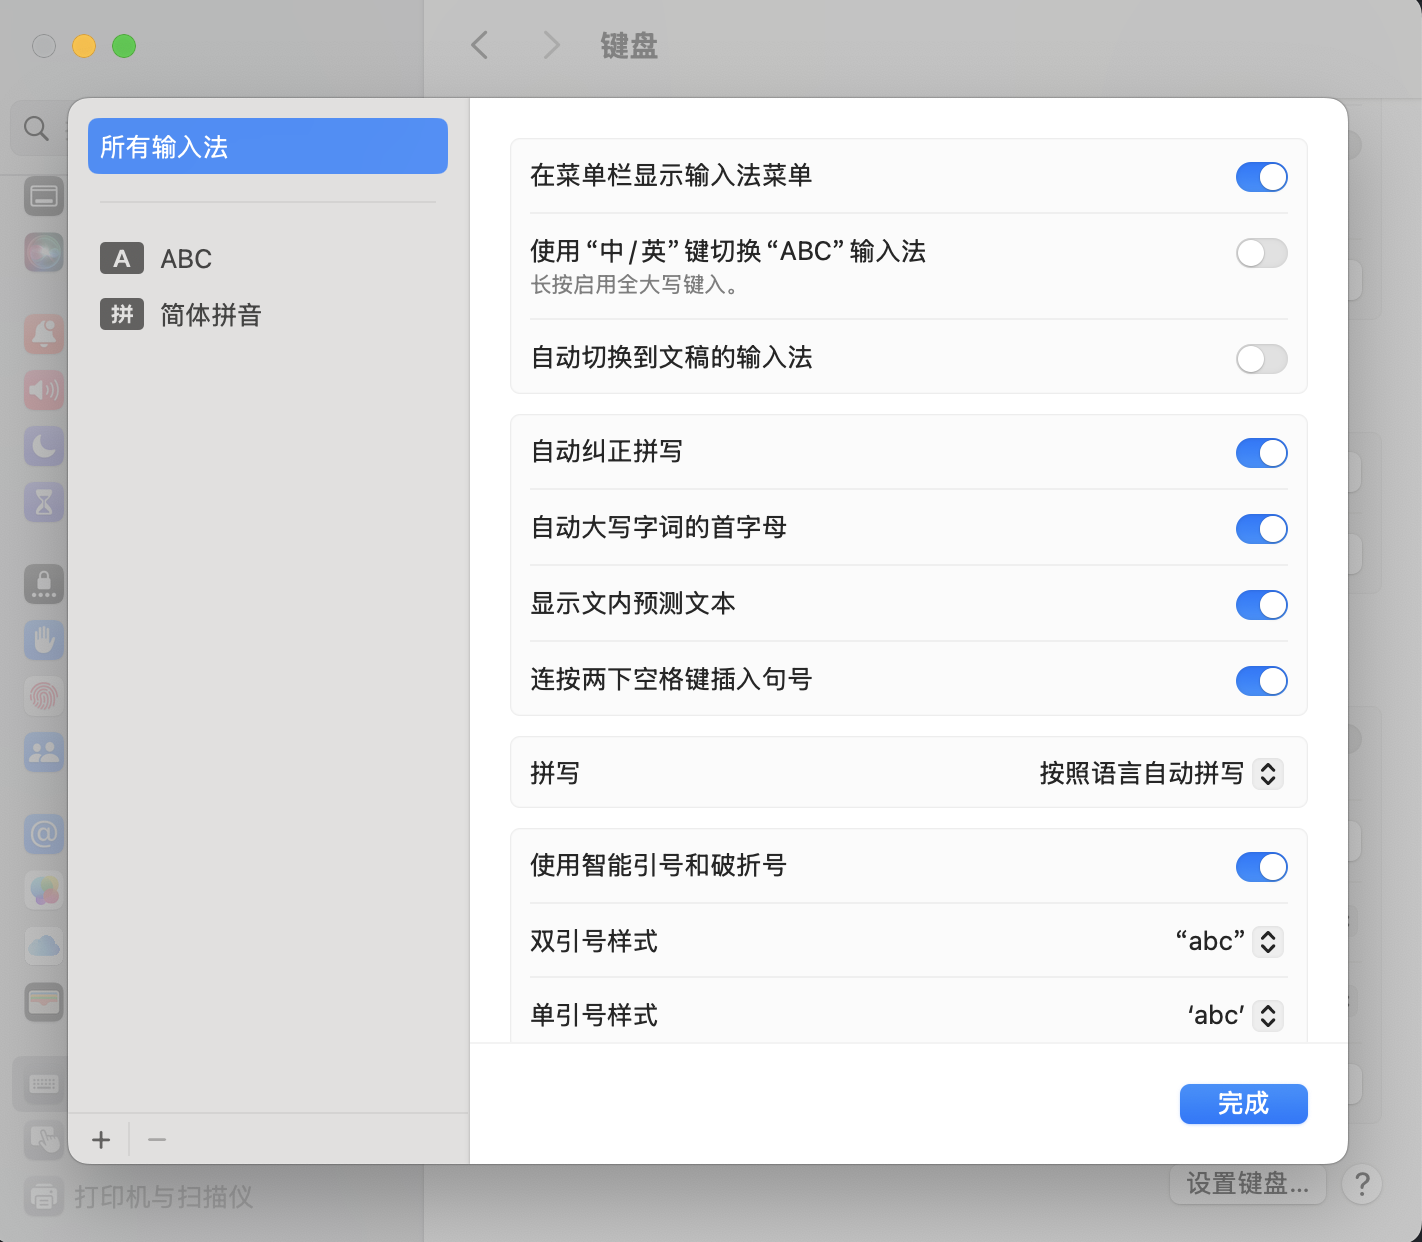
search,问题出在默认的键盘设置上
进入设置>键盘>,点文字输入法下面右边的编辑
修改输入设置
把上面这个「使用“中/英”键切换“ABC”输入法」的选项关掉,这个选项是用
CapsLock
切换输入法而非切换中英文输入,简体拼音输入法有自己的中英文输入切换,把这个选项取消掉之后,点
CapsLock 就是切换中英文输入,这时使用 ctrl+space
切换输入法,或 ctrl+option+space 切换最近两个输入法 。
常用快捷键
截图
cmd+shift+4 框选截图cmd+shift+5 可以选择窗口截图等功能
文本编辑
fn+left Homefn+right Endcmd+A 行首cmd+E 行尾 (这俩的行为似乎是不一样的,可能还是 fn
的更好用)
窗口操作
cmd+tab 切换打开的程序,按 tab
从左往右依次框选,如果这个程序使用 cmd+h
隐藏,那么这样就能切换,但是如果你通过左上角的 x 或者
-,就需要这时候再按住option,然后一起松开(睿智)。
Clang VSCode 下的 C/C++
环境配置
WTF,怎么会有这么弱智的问题,默认用 C/C++ 的拓展,程序会在
debug console 输出,但是你不能输入,我吃
🍋。
找了老半天也没找到 Graceful
的解决方案,最终找到的是一个凑合解,非常麻烦,你需要写
tasks.json 和 launch.json,解决方案是用的
externalTerminal,通过外部的终端打开程序,然后 debug 正常在
VSCode 中进行,要不然用 lldb 直接终端搞(不过其实也差不太多)。
那么先给出两个 .json
tasks.json 1 2 3 4 5 6 7 8 9 10 11 12 13 14 15 16 17 18 19 20 21 22 23 24 25 26 27 28 29 30 31 32 33 34 35 36 37 38 39 40 41 42 43 44 45 46 47 48 49 { "version" : "2.0.0" , "tasks" : [ { "type" : "cppbuild" , "label" : "build active cpp file" , "command" : "/usr/bin/clang++" , "args" : [ "-fcolor-diagnostics" , "-fansi-escape-codes" , "-g" , "${file}" , "-o" , "${fileDirname}/${fileBasenameNoExtension}" ] , "options" : { "cwd" : "${fileDirname}" } , "problemMatcher" : [ "$gcc" ] , "group" : "build" , "detail" : "compiler: /usr/bin/clang++" } , { "type" : "cppbuild" , "label" : "build active c file" , "command" : "/usr/bin/clang" , "args" : [ "-fcolor-diagnostics" , "-fansi-escape-codes" , "-g" , "${file}" , "-o" , "${fileDirname}/${fileBasenameNoExtension}" ] , "options" : { "cwd" : "${fileDirname}" } , "problemMatcher" : [ "$gcc" ] , "group" : "build" , "detail" : "compiler: /usr/bin/clang" } , { "label" : "Open Terminal" , "type" : "shell" , "command" : "osascript -e 'tell application \"Terminal\"\ndo script \"echo hello\"\nend tell'" , "problemMatcher" : [ ] } ] }
launch.json 1 2 3 4 5 6 7 8 9 10 11 12 13 14 15 16 17 18 19 20 21 22 23 24 25 26 27 28 29 30 31 32 33 34 { "version" : "0.2.0" , "configurations" : [ { "name" : "cpp debug - clang++" , "type" : "cppdbg" , "request" : "launch" , "program" : "${fileDirname}/${fileBasenameNoExtension}" , "args" : [ ] , "stopAtEntry" : true , "cwd" : "${workspaceFolder}" , "environment" : [ ] , "externalConsole" : true , "MIMode" : "lldb" , "preLaunchTask" : "build active cpp file" } , { "name" : "c debug - clang" , "type" : "cppdbg" , "request" : "launch" , "program" : "${fileDirname}/${fileBasenameNoExtension}" , "args" : [ ] , "stopAtEntry" : true , "cwd" : "${workspaceFolder}" , "environment" : [ ] , "externalConsole" : true , "MIMode" : "lldb" , "preLaunchTask" : "build active c file" } ] }
然后打开一个 .cpp 页面,debug 选择 cpp debug - clang++
或者你打开一个 .c 页面 debug 选择
c debug - clang,如果你遇到了终端无法弹出的情况,依次选择
Terminal>Run Task>Open Terminal
然后在弹窗中选择给予权限。
bits/stdc++.h
严格来说不是一个 cpp 的标准库,只是一系列头文件的引用集,是 gnu
独有的,clang++ 下要用这个得自己加 include path
我们可以在 ~ 下创建一个 include
目录,其中包含 bits/stdc++.h,内容如下,是在 gnu
基础上去除了不兼容头
stdc++.h 1 2 3 4 5 6 7 8 9 10 11 12 13 14 15 16 17 18 19 20 21 22 23 24 25 26 27 28 29 30 31 32 33 34 35 36 37 38 39 40 41 42 43 44 45 46 47 48 49 50 51 52 53 54 55 56 57 58 59 60 61 62 63 64 65 66 67 68 69 70 71 72 73 74 75 76 77 78 79 80 81 82 83 84 85 86 87 88 89 90 91 92 93 94 95 96 97 98 99 100 101 102 103 104 105 106 107 108 109 110 111 112 113 114 115 116 117 118 119 120 121 122 123 124 125 126 127 128 129 130 131 132 133 134 135 136 137 138 139 140 141 142 143 144 145 146 147 148 149 150 151 152 153 #ifndef _GLIBCXX_NO_ASSERT #include <cassert> #endif #include <cctype> #include <cerrno> #include <cfloat> #include <ciso646> #include <climits> #include <clocale> #include <cmath> #include <csetjmp> #include <csignal> #include <cstdarg> #include <cstddef> #include <cstdio> #include <cstdlib> #include <cstring> #include <ctime> #include <cwchar> #include <cwctype> #if __cplusplus >= 201103L #include <ccomplex> #include <cfenv> #include <cinttypes> #include <cstdalign> #include <cstdbool> #include <cstdint> #include <ctgmath> #include <cuchar> #endif #include <algorithm> #include <bitset> #include <complex> #include <deque> #include <exception> #include <fstream> #include <functional> #include <iomanip> #include <ios> #include <iosfwd> #include <iostream> #include <istream> #include <iterator> #include <limits> #include <list> #include <locale> #include <map> #include <memory> #include <new> #include <numeric> #include <ostream> #include <queue> #include <set> #include <sstream> #include <stack> #include <stdexcept> #include <streambuf> #include <string> #include <typeinfo> #include <utility> #include <valarray> #include <vector> #if __cplusplus >= 201103L #include <array> #include <atomic> #include <chrono> #include <codecvt> #include <condition_variable> #include <forward_list> #include <future> #include <initializer_list> #include <mutex> #include <random> #include <ratio> #include <regex> #include <scoped_allocator> #include <system_error> #include <thread> #include <tuple> #include <typeindex> #include <type_traits> #include <unordered_map> #include <unordered_set> #endif #if __cplusplus >= 201402L #include <shared_mutex> #endif #if __cplusplus >= 201703L #include <any> #include <charconv> #include <filesystem> #include <optional> #include <memory_resource> #include <string_view> #include <variant> #endif #if __cplusplus > 201703L #include <barrier> #include <bit> #include <compare> #include <concepts> #if __cpp_impl_coroutine # include <coroutine> #endif #include <latch> #include <numbers> #include <ranges> #include <span> #include <stop_token> #include <semaphore> #include <source_location> #include <syncstream> #include <version> #endif
然后在 VSCode 中配置 includePath 并为了全局可用,可以在
~/.zshrc 或 ~/.zprofile 中添加
1 export CPLUS_INCLUDE_PATH="$HOME /include:$CPLUS_INCLUDE_PATH "
Redis
通过 brew install redis 安装即可
需要注意的是如果用官方的 tap,无法用 brew services
管理,我这个时候直接用 brew 的 formula,版本和 tap 一致
安装完成后通过 brew services start redis 以及
brew services stop redis 管理服务
Pandoc
通过 brew install pandoc 安装即可